
When it comes to maintaining your water heater, one component often overlooked, but crucial to its longevity, is the anode rod. This small, simple part can have a huge impact on the health of your water heater. Understanding its role and how to check it regularly can help you avoid costly repairs and extend the life of your water heater.
At Connors, we understand the importance of proper water heater care. In this guide, we’ll walk you through how to check your anode rod, why it’s important, and what to do if it’s worn out. By following these 7 simple steps, you can ensure that your water heater stays in top condition for years to come.
What Is an Anode Rod, and Why Is It Important?
Your water heater’s anode rod plays a key role in preventing rust and corrosion. Since the tank is made of steel, it’s prone to rusting when exposed to water and oxygen. Harmful elements like sediment and minerals can speed up this process. To protect the tank, the anode rod—made from an electrically reactive metal like magnesium or aluminum—attracts sediment and minerals to itself. The anode rod corrodes first, protecting the steel tank from damage and helping your water heater last longer.
Over time, however, the anode rod itself will wear down, and if not replaced, your water heater will be vulnerable to rust, corrosion, and premature failure. Regularly checking the anode rod is essential to maintaining the health of your water heater and preventing costly damage.
How to Tell When Your Anode Rod Needs Checking
There are a few signs that indicate it’s time to check or replace your anode rod:
- Unpleasant Odor: If you notice a rotten egg smell coming from your hot water, this could be a sign of bacteria growing inside your water heater due to a degraded anode rod.
- Rust in Your Hot Water: If you notice rust-colored water, it’s likely a sign that your water heater tank is starting to corrode and that the anode rod is no longer doing its job.
- Noisy Water Heater: Sediment build-up inside the tank—often caused by a deteriorating anode rod—can result in popping or rumbling noises.
- Decreased Hot Water Supply: If your hot water isn’t as hot as it used to be, or you’re running out of hot water more quickly than normal, it could be time to check the rod.
7 Simple Steps to Check Your Anode Rod
Checking the anode rod in your water heater is a manageable task if you follow these simple steps. Just make sure to take the necessary safety precautions before starting any maintenance on your water heater.
Step 1: Turn Off the Power and Water Supply
Before performing any maintenance on your water heater, follow these safety steps:
- Electric Water Heater: Switch off the power at the circuit breaker.
- Gas Water Heater: Turn off the gas supply and make sure the pilot light is extinguished.
- Turn Off the Cold Water Supply: Shut off the water supply to the water heater.
- Relieve Pressure: Open a hot water faucet somewhere in the house to relieve any pressure inside the tank.
Step 2: Drain a Small Amount of Water
Connect a garden hose to the drain valve at the bottom of the tank, directing it to a drain or outside. Open the drain valve to allow a small amount of water to flow out. This step helps relieve pressure inside the tank and ensures that you’re working with a safe, manageable environment.
Step 3: Locate the Anode Rod
At the top of your water heater, you should be able to find the anode rod, usually secured with a hex head bolt or under a plastic cap. If the anode rod is built directly into the water heater’s system, you may need a plumber’s assistance to access or replace it.
Step 4: Remove the Anode Rod
Use a socket wrench and a 1 1/16-inch socket to unscrew the anode rod’s securing bolt or nut. You may need to remove any plastic covers or caps to access the rod. Once the bolt is removed, carefully pull out the rod.
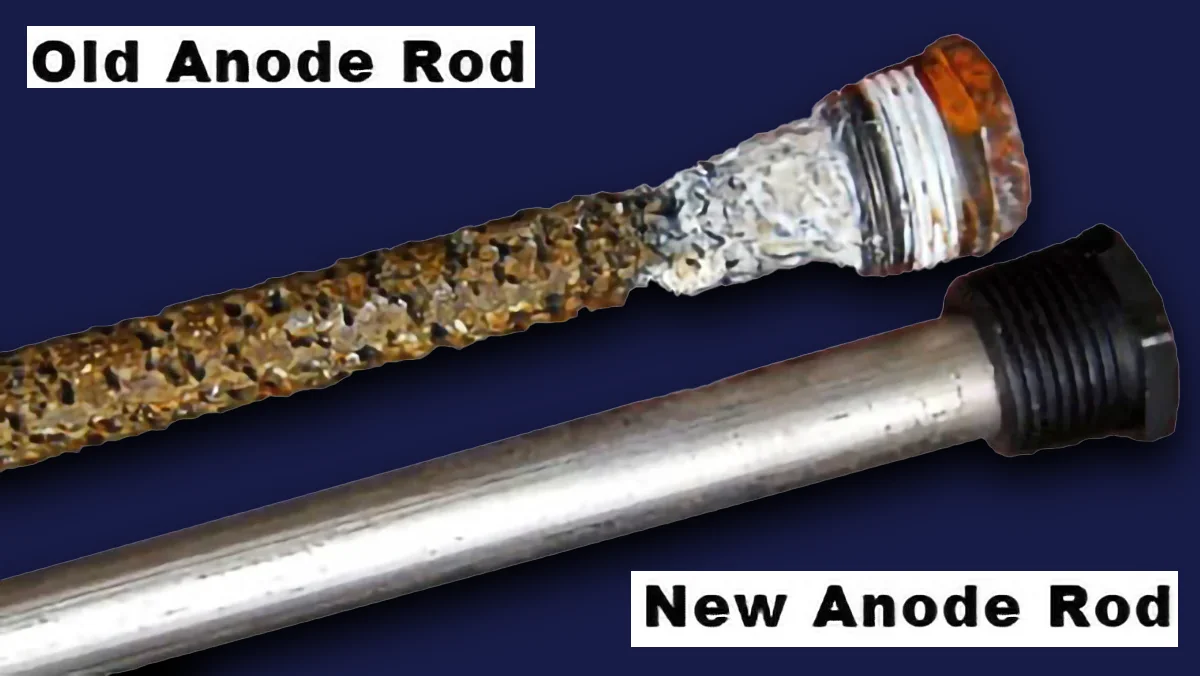
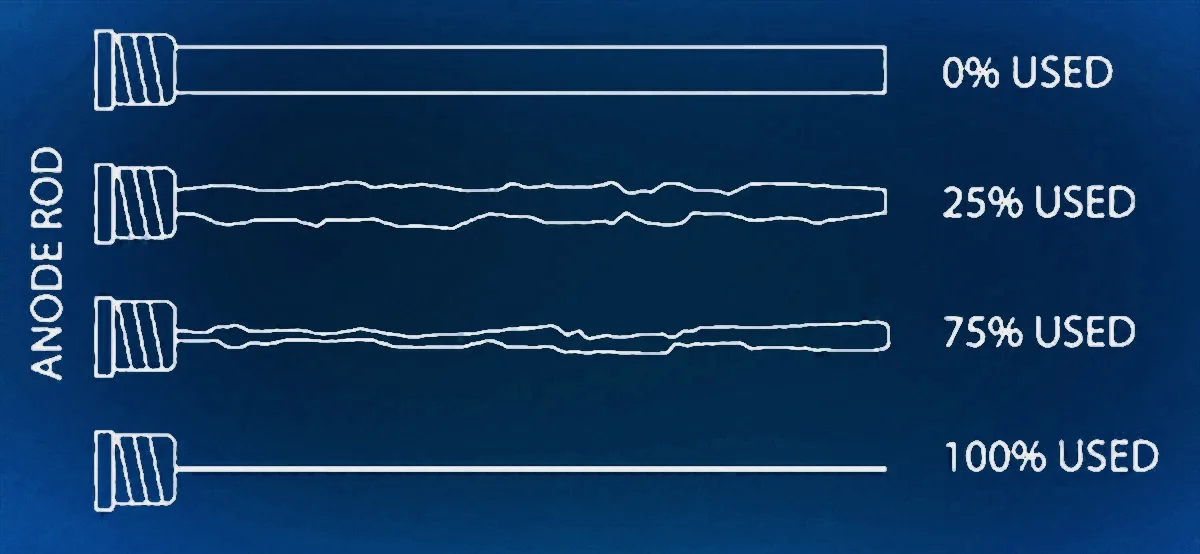
Step 5: Inspect the Anode Rod
Check the condition of the anode rod. It should be about ¾ inch thick when new. Look for signs of wear, such as:
- Corrosion: If the rod is corroded down to less than ½ inch thick or is covered with calcium buildup, it needs to be replaced.
- Broken Rod: If the rod is cracked or broken, it’s time for a new one.
- Rust Inside the Tank: If you see rust developing inside the tank, it may be an indication that the rod is no longer functioning properly.
Step 6: Replace the Anode Rod (if Necessary)
If the rod is worn out or damaged, replace it with a new one. Anode rods typically cost between $30 to $60 and can be purchased at most hardware stores. When installing the new rod, wrap the threads with Teflon tape to create a secure seal and prevent leaks. Install the new rod and tighten it carefully.
Step 7: Check for Leaks
After replacing the anode rod, turn the water supply back on and check for any leaks. If you notice any, tighten the rod further or add more Teflon tape to ensure the seal is secure.
Final Thoughts
Maintaining your water heater by regularly checking the anode rod is an essential part of ensuring the longevity and efficiency of your system. A healthy anode rod helps prevent corrosion, extends the life of your water heater, and ensures that your home’s hot water remains clean and reliable.
If you’re unsure about performing this maintenance yourself or feel uncomfortable handling the process, it’s always best to call a professional plumber. At Connors Plumbing, Heating, and Air, we’re happy to provide expert plumbing services and advice. Whether you need help with your water heater or any other plumbing issue, we’re here to assist you.
By taking care of your anode rod and conducting routine maintenance, you’ll help prevent costly water heater failures and enjoy years of worry-free hot water. Contact Connors Plumbing, Heating, and Air today for all your water heater and plumbing needs!